From Design to Code - Creating “Your BMI Buddy” with Flutter [Part 2]
In this article, we will be completing the Calculate and Result Screen, implement the BMI Logic and the Unit testing.

![From Design to Code - Creating “Your BMI Buddy” with Flutter [Part 2]](/content/images/size/w2000/2025/10/From-Design-to-Code---Creating--Your-BMI-Buddy--with-Flutter--Part-1--1.png)
Welcome back to part 2 of turning design to code.
In part 1 of this series, we completed the HomeScreen for Your BMI Buddy.
In this article, we will be completing the Calculate and Result Screen, implement the BMI Logic and the Unit testing.
Let us dive right in!
Building the CalculatorScreen
The background shares the same gradient as the Home Screen. Therefore to avoid duplication, we will be refactoring our code into an extension.
I previously wrote an article on extension. Please feel free to check out the Link to learn more.
Creating a gradient extension
extension BackgroundGradient on BuildContext {
  BoxDecoration get backgroundGradient => BoxDecoration(
    gradient: LinearGradient(
      begin: Alignment.bottomRight,
      end: Alignment.topLeft,
      colors: <Color>[
        Color(0xFF0F2333),
        Color(0xFF247BA0),
        Color(0xFF189AE5),
      ],
      stops: [0.50, 0.90, 1.00],
    ),
  );
}
This extension adds a getter to the buildContext.
decoration: context.backgroundGradientSetting up the structure
The calculator screen has 5 components
- GreetingWidget
- CustomTextFields (from Part 1)
- CustomPrimaryButton (from Part 1)
- EditProfileWidget
- PointerWidget
Creating the GreetingsWidget
class GreetingsWidget extends StatelessWidget {
  const GreetingsWidget({super.key});

  @override
  Widget build(BuildContext context) {
    return Column(
      children: [
        Text(
          "Hi, Zaahra!",
          style: GoogleFonts.caveat(
            color: Colors.white,
            fontSize: 40,
            fontWeight: FontWeight.bold,
            letterSpacing: 0.40,
          ),
        ),
        Text(
          "Let's Calculate Your \nBMI",
          textAlign: TextAlign.center,
          style: GoogleFonts.inter(
            color: Colors.white,
            fontSize: 18,
            fontWeight: FontWeight.w500,
            letterSpacing: 0.40,
          ),
        ),
      ],
    );
  }
}
This widget welcomes the user and displays a subtitle "Let's calculate your BMI".
- "Zaahra" will be later made dynamic, therefore the code will become
"Hi, $name" - GoogleFonts.caveat gives a friendly, handwritten feel.
Adding our TextFields
We reuse our CustomTextFields from Part 1:
CustomTextFields(
   keyValue: Key("weight"),
   controller: weightController,
   onChanged: (String value) => setState(() {}),
   hintText: 'Weight',
 ),
Gap(24),
CustomTextFields(
   keyValue: Key("height"),
   controller: heightController,
   onChanged: (String value) => setState(() {}),
   hintText: 'Height',
 ),
Each field listens to the user input and updates the UI accordingly
Adding the Button
Once again, we reuse our CustomPrimaryButton made in Part 1:
CustomPrimaryButton(
 onTap: () => Navigator.push(
  context,
  MaterialPageRoute(
  builder: (context) => ResultScreen(),
   ),
  ),
 buttonName: 'Calculate BMI',
),
This button triggers the "Calculate BMI", navigating us to "Results Screen". However shortly we will change this functionality to calculate the BMI and pass the results to the Result Screen.
Creating and Using the Edit Profile Widget
Sometimes users may want to change their details (like name or DOB).
Let’s create an EditProfileWidget that takes them back to the Home Screen.
class EditProfileWidget extends StatelessWidget {
  final VoidCallback onTap;
  final String buttonName;

  const EditProfileWidget({
    super.key,
    required this.onTap,
    required this.buttonName,
  });

  @override
  Widget build(BuildContext context) {
    return InkWell(
      onTap: onTap,
      child: Row(
        children: [
          Icon(
            Icons.edit,
            color: Colors.white,
            size: 18,
          ),
          Gap(16),
          Text(
            buttonName,
            style: GoogleFonts.inter(
              color: Colors.white,
              fontSize: 14,
            ),
          ),
        ],
      ),
    );
  }
}
Example:
 EditProfileWidget(
    onTap: () => Navigator.push(
        context,
        MaterialPageRoute(
            builder: (context) => HomeScreen(),
        ),
    ),
    buttonName: 'Edit Profile',
),
Creating the PointerWidget
Indicating us to enter our height and weight to calculate our BMI (it is just a fun way)
Here we will be using Positioned widget, in order to make this work, we will also have to wrap our SizedBox Widget with Stack.
Positioned(
  right: 16,
  bottom: 16,
  child: IgnorePointer(
    child: Image.asset(
      'assets/finger.png',
      width: 240,
      fit: BoxFit.contain,
    ),
  ),
)
Now that we are done with Calculate Screen, we are going to build the Result Screen.
Building the ResultScreen
The result screen uses the same background gradient as the other pages, so we’ll keep things DRY with our extension: decoration: context.backgroundGradient
Beyond that, Result Screen has some complexities. We will be drawing an arc and a wave in the background. We will use CustomPainter for both.
Building the Arc
I’ll keep this as approachable as possible and add extra links in the references later for deeper dives into custom painting.
CustomPaint(
  size: Size(arcWidth, 200),
  painter: ArcsPainter(
  bmi: 20,
  minBmi: 10,
  maxBmi: 40,
  ),
)
class ArcsPainter extends CustomPainter {
final double bmi, minBmi, maxBmi;
ArcsPainter({required this.bmi, required this.minBmi, required this.maxBmi});
@override
void paint(Canvas canvas, Size size) {
final startAngle = math.pi;
final sweepAngle = math.pi;
final strokeWidth = 22.0;
final center = Offset(size.width / 2, size.height);
final radius = size.width * 0.55;
final rect = Rect.fromCircle(center: center, radius: radius);
// 1) BACKGROUND TRACK (behind the arc)
final trackPaint = Paint()
..style = PaintingStyle.stroke
..strokeCap = StrokeCap.round
..strokeWidth = strokeWidth + 4
..color = const Color(0xFF0B2534).withOpacity(0.35)
..maskFilter = const MaskFilter.blur(
BlurStyle.normal,
2.0,
);
canvas.drawArc(rect, startAngle, sweepAngle, false, trackPaint);
final gradient = SweepGradient(
stops: [0.0, 0.5, 1.0],
startAngle: startAngle,
endAngle: startAngle + sweepAngle,
colors: [
Color(0xFF24A056),
Color(0xFFFCE700),
Color(0xFFFC1300),
],
).createShader(rect);
final arcPaint = Paint()
..strokeWidth = strokeWidth
..style = PaintingStyle.stroke
..strokeCap = StrokeCap.butt
..shader = gradient;
canvas.drawArc(rect, startAngle, sweepAngle, false, arcPaint);
final capR = strokeWidth / 2;
// ---- compute arc endpoints ----
final startPt = Offset(
center.dx + radius * math.cos(startAngle),
center.dy + radius * math.sin(startAngle),
);
final endPt = Offset(
center.dx + radius * math.cos(startAngle + sweepAngle),
center.dy + radius * math.sin(startAngle + sweepAngle),
);
canvas.drawCircle(
startPt,
capR,
Paint()..color = const Color(0xFF24A056),
);
canvas.drawCircle(
endPt,
capR,
Paint()..color = const Color(0xFFFC1300),
);
// ---- animated indicator (white knob) ----
final t = ((bmi - minBmi) / (maxBmi - minBmi)).clamp(0.0, 1.0);
final angle = startAngle + sweepAngle * t;
final knob = Offset(
center.dx + radius * math.cos(angle),
center.dy + radius * math.sin(angle),
);
// ---- white knob ----
canvas.drawCircle(knob, capR * 1.4, Paint()..color = Colors.white);
canvas.drawCircle(
knob,
capR * 1.4,
Paint()
..style = PaintingStyle.stroke
..strokeWidth = 2
..color = Colors.white.withOpacity(0.25),
);
}
@override
bool shouldRepaint(CustomPainter oldDelegate) => false;
}For this,
- We draw a semi circle starting from the left to the right. We compute this using the
Rect.fromCircle - We then draw a stroke with a blur behind the main arc.
SweepGradientis used for the sole purpose of adding a gradient to the arc. This is applied to the arc usingshadermethod.- It was a challenge making the arc rounded at the endpoints, which is why I decided to go with building "circles" to add at the endpoint by calculating their angles.
- A white knob is used to indicate at what level the BMI is.
Moving on to the WavePainter
To match the original design more closely, I drew a custom bezier wave behind the content. This bit is mostly visual math—so I’m keeping it lightweight here and will point to references later.
class WavePainter extends CustomPainter {
  @override
  void paint(Canvas canvas, Size size) {
    final w = size.width;
    final h = size.height;

    final path = Path()
      ..moveTo(0, h * 0.28)
      ..cubicTo(
        w * 0.18,
        h * 0.22,
        w * 0.58,
        h * 0.60,
        w * 0.82,
        h * 0.40,
      )
      ..cubicTo(
        w * 1.18,
        h * 0.10,
        w * 1.02,
        h * 0.38,
        w * 1.08,
        h * 0.52,
      )
      ..lineTo(w * 1.08, h)
      ..lineTo(0, h)
      ..close();

    final fillShader = const LinearGradient(
      begin: Alignment.bottomCenter,
      end: Alignment.topCenter,
      colors: [
        Color(0xFF64B8FF),
        Color(0xFFD9ECFF),
      ],
      stops: [0.0, 1.0],
    ).createShader(Rect.fromLTWH(0, 0, w, h));

    final fill = Paint()
      ..shader = fillShader
      ..style = PaintingStyle.fill;

    canvas.drawShadow(path, Colors.black.withOpacity(0.45), 22, false);

    canvas.drawPath(path, fill);
  }

  @override
  bool shouldRepaint(covariant CustomPainter oldDelegate) => false;
}
The important parts are:
- We start at the
left, about 28% from the top - Then use 2
cubicToto make theBeziersegment. We basically need to add "control points" in order to make this wave possible. - Then we will the background with a gradient color using
LinearGradient. shouldRepaintis used in case there is a need to repaint this background.
Let's wire these custom painters properly inside the ResultScreen.
We will layer the wave behind everything and draw the arc on top.
A stack widget is perfect here since the bottom layer uses Positioned.fill with a CustomPaint for the wave, and the top layer places the arc where we want it.
Positioned.fill(
  child: CustomPaint(
  painter: WavePainter(),
  ),
),Positioned.fillkeeps the wave perfectly stretched behind the pageStack,fit expand, ensures the stack matches the screen bounds without extra containers
 Positioned(
  top: topInset,
  left: (size.width - arcWidth) / 2,
  child: TweenAnimationBuilder<double>(
  tween: Tween<double>(begin: 0, end: 23),
  duration: Duration(milliseconds: 900),
  curve: Curves.easeOutCubic,
  builder: (context, animatedBmi, _) {
    return CustomPaint(
      size: Size(arcWidth, 200),
      painter: ArcsPainter(
        bmi: bmiResult,
        minBmi: 10,
        maxBmi: 40,
        ),
      );
    },
  ),
),
And that's basically it for the UI portion.
Time to make this application functional!
We will start by creating Calculator that handles the logic for us. This class includes methods; parse(), bmiCalc(), and displayBMI().
class Calculator {
  const Calculator();

  double? parse(String text) {
    if (text.trim().isEmpty) return null;
    return double.tryParse(text.replaceAll(',', '.'));
  }

  double? bmiCalc(double? weight, double? height) {
    if (weight == null || height == null || height <= 0) return null;
    //check if height is in m or cm
    final convertedHeight = height > 3 ? height / 100 : height;
    return weight / pow(convertedHeight, 2);
  }

  double? displayBMI(String weightText, String heightText) {
    final weight = parse(weightText);
    final height = parse(heightText);

    if (weight != null && height != null) {
      var result = bmiCalc(weight, height);
      return result;
    }
    return -1;
  }
}
Basically, it has several methods.
parsechecks if the input is empty or invalid. It then converts the numbers. For example if "70" is entered, the method will convert it to "70.0", or if "30,2" is entered, it will be converted to "30.2".bmiCalcensures that both the weight and the height are valid before calculating the BMI. It even checks whether height is meters or centimeters.displayBMIis another method which calls the others, and returns the final BMI result to be displayed on the screen.
Once this logic is created, we call it inside of our CalculateScreen. Whenever a user taps on the "calculate BMI" button, the displayBMI is triggered, and the result is pushed to the ResultScreen as follows:
CustomPrimaryButton(
  onTap: () {
    // Calculate the BMI, then push to the result screen.
    final calc = const Calculator();
    final bmiResult = calc.displayBMI(
      weightController.text,
      heightController.text,
    );

    if (bmiResult == -1) {
      ScaffoldMessenger.of(context).showSnackBar(
        const SnackBar(
          content: Text(
            'Please enter a valid weight and height.',
          ),
        ),
      );
      return;
    }

    Navigator.push(
      context,
      MaterialPageRoute(
        builder: (context) => ResultScreen(
          bmiResult: bmiResult,
        ),
      ),
    );
  },
  buttonName: 'Calculate BMI',
);
In Result Screen, we simply accept the "bmiResult" in the constructor
final double? bmiResult;

const ResultScreen({
  super.key,
  required this.bmiResult,
});
And there you go...! That was the logic part done! :D
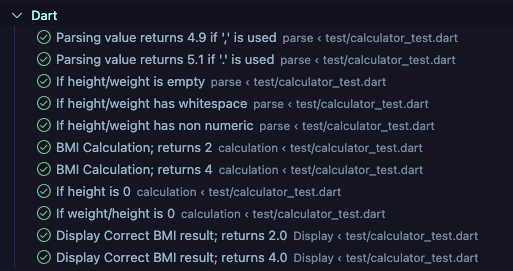
Unit tests for Calculator logic.
Unit tests ensures our logics work correctly before wiring it into the UI. We will use the test package to validate each method.
import 'package:flutter_bmi_calculator/calculator.dart';
import 'package:test/test.dart';

void main() {
  group('parse', () {
    test("Parsing value returns 4.9 if ',' is used", () {
      final calculator = Calculator();

      final result = calculator.parse("4,9");

      expect(result, 4.9);
    });

    test("Parsing value returns 5.1 if '.' is used", () {
      final calculator = Calculator();

      final result = calculator.parse("5.1");

      expect(result, 5.1);
    });

    test("If height/weight is empty", () {
      final calculator = Calculator();

      final result = calculator.parse("");

      expect(result, isNull);
    });

    test("If height/weight has whitespace", () {
      final calculator = Calculator();

      final result = calculator.parse("   ");

      expect(result, isNull);
    });

    test("If height/weight has non numeric", () {
      final calculator = Calculator();

      final result = calculator.parse("xyz");

      expect(result, isNull);
    });
  });

  group("calculation", () {
    test("BMI Calculation; returns 2", () {
      final calculator = Calculator();

      final result = calculator.bmiCalc(8, 2);

      expect(result, 2);
    });

    test("BMI Calculation; returns 4", () {
      final calculator = Calculator();

      final result = calculator.bmiCalc(16, 2);

      expect(result, 4);
    });

    test("If height is 0", () {
      final calculator = Calculator();

      final result = calculator.bmiCalc(0, 2);

      expect(result, 0.0);
    });

    test("If height is 0", () {
      final calculator = Calculator();

      final result = calculator.bmiCalc(8, 0);

      expect(result, isNull);
    });

    test("If weight/height is 0", () {
      final calculator = Calculator();

      final result1 = calculator.bmiCalc(null, 2);
      expect(result1, isNull);

      final result2 = calculator.bmiCalc(8, null);
      expect(result2, isNull);
    });
  });

  group("Display", () {
    test("Display Correct BMI result; returns 2.0", () {
      final calculator = Calculator();

      final result = calculator.displayBMI("8", "2");

      expect(result, 2.0);
    });

    test("Display Correct BMI result; returns 4.0", () {
      final calculator = Calculator();

      final result = calculator.displayBMI("16", "2");

      expect(result, 4.0);
    });
  });
}
After running the test, all assertions pass successfully, confirming our logic work as expected.
I will write a separate article later that dives deeper into Flutter testing. ;)
Thank you for reading! I hope you enjoyed this article :D.
Up next: We will be integrating AI Agents in the Application.
References

About Me
I am Zaahra, a Google Women Techmakers Ambassador who enjoy mentoring people and writing about technical contents that might help people in their developer journey. I also enjoy building stuffs to solve real life problems.
To reach me:
LinkedIn: https://www.linkedin.com/in/faatimah-iz-zaahra-m-0670881a1/
X (previously Twitter): _fz3hra
GitHub: https://github.com/fz3hra
Cheers,
Umme Faatimah-Iz-Zaahra Mujore | Google Women TechMakers Ambassador | Software Engineer