[.NET]: Creating an Expense Tracker CLI

After having created a small CLI app last time, I decided to do it again, this time with a tool called Expense Tracker.
An expense tracker is a simple tool to enter expenses and track the total spend for the current year and by month. It’s small enough to be fun but big enough to show off some real structure.
The requirement is such that:
- user should be able to add an expense with description and amount
- user should be able to update an expense
- user should be able to delete an expense
- user should be able to view all expenses
- user should be able to view summary of all expenses
- user should be able to view a summary of expenses for a specific month and year
- Bonus: A user should be able to export expenses to a CSV file
The data revolves around 4 key fields:
- Id
- Date
- Expense Name (Name)
- Expense Amount (Amount)
Here's what the CLI commands look like:
expense-tracker read
expense-tracker add --name "your_expense_name" --amount "your_expense_amount"
expense-tracker delete --id "your_expense_id"
expense-tracker update --id "your_expense_id" --name "your_expense_name" --amount "your_expense_amount"
expense-tracker summary
expense-tracker summary --month month_of_your_choice
expense-tracker summary --month month_of_your_choice --year year_of_your_choice
expense-tracker export-csv --out ~/Optional_folder_name/your_expense_file_name.csv
Just like my previous CLI project, I used System.CommandLine from NuGet. You may read it here if you've missed some of the basics explanations that I have gone through already: Link
I started everything inside Program.cs at first. Once the core logic worked, I refactored it into cleaner layers.
Features:
To start with; I identified the simple functionalities like CRUD
Let us start with Reading Expenses
For readCommand we are basically are only reading from our JSON file, therefore fileOption is passed into the ExpenseRepository which we will see shortly. We will then pass the repository into the ExpenseService and call the ReadExpenses which displays our data.
readCommand.SetAction(result =>
            {
                var file = result.GetValue(fileOption);
                var repo = new ExpenseRepository(file);
                var service = new ExpenseService(repo);
                service.ReadExpenses();
            }
        );
Adding Expenses
For createCommand I knew that the user would be passing the expense name and expense amount, So I created nameOption, and amountOption as follows
Option<string> nameOption = new("--name")
{
    Description = "description for expenses",
    Required = true,
    AllowMultipleArgumentsPerToken = true
};

Option<decimal> amountOption = new("--amount")
{
    Description = "amount for expenses",
    Required = false,
};
The reason I used Option type is because it makes the CLI self-documenting, as shown:
expense-tracker add --name "groceries" --amount "10"
It is not necessary to use option for name and amount but I used this to show you it is in fact possible. My original code was using Argument which I omitted later.
Then I wrote the action:
createCommand.SetAction(result =>
            {
                var file = result.GetValue(fileOption);
                var name = result.GetValue(nameOption);
                var amount = result.GetValue(amountOption);

                var repo = new ExpenseRepository(file);
                var service = new ExpenseService(repo);
                service.CreateExpense(name, amount);
            }
);Name, and amount is being passed to CreateExpense which is found in the ExpenseService. It creates our new object via the Expense model.
Repository and Service Layers
Now that we have plugged in the required methods, let me show you in detail the ExpenseRepository and ExpenseService.
While making this project, I tried to follow SOLID principles. Even though it’s small, I wanted to show how a bigger project could evolve cleanly.
In IExpenseRepository I created an interface to hold Load and Save methods. Having this interface means later I can change from JSON to using a DB without using my CLI logic.
public interface IExpenseRepository
{
    List<Expense> Load();
    void Save(List<Expense> items);
}
In ExpenseRepository, we are able to read and write the file being used.
public class ExpenseRepository: IExpenseRepository
{
    private readonly FileInfo _file;

    public ExpenseRepository(FileInfo file)
    {
        _file = file;
        _file.Directory?.Create();
        if (!_file.Exists) File.WriteAllText(_file.FullName, "[]");
    }
    public List<Expense> Load()
    {
        if(!_file.Exists) return new List<Expense>();
        string json = File.ReadAllText(_file.FullName);
        return string.IsNullOrWhiteSpace(json) ? new List<Expense>() :
            (JsonSerializer.Deserialize<List<Expense>>(json) ?? new List<Expense>());
    }


    public void Save(List<Expense> items)
    {
        Console.WriteLine("Serialising expenses list...");
        var json = JsonSerializer.Serialize(items);
        File.WriteAllText(_file.FullName, json);
    }
}
In order to make this work, I decided to use the Constructor Injection in ExpenseService which allows me to pass the IExpenseRepository into it.
  private readonly IExpenseRepository _expenseRepository;

    public ExpenseService(IExpenseRepository expenseRepository)
    {
        _expenseRepository = expenseRepository;
    }
And now, I can call _expenseRepository whenever required.
For example, in my ReadExpenses, I am basically loading the expenses as an object and using it to display the id, name and amount as such
 public void ReadExpenses()
    {
        var items = _expenseRepository.Load();
        foreach (var item in items)
        {
            Console.WriteLine($"Id: {item.Id}, Name: {item.Name}, Amount: {item.Amount}");
        }
    }
So far so good.
ExpenseService will not only hold ReadExpenses method but it will also contain of CreateExpenses, DeleteExpense, UpdateExpense and ClearExpense. They all follow the same logic as earlier applied to them - only the computation is different.
For creating new expenses, the command will consists of an Alias, and options --name, and --amount. What we are trying to do here, is basically passing name and amount as such
expense-tracker add --name "groceries" --amount "10"
Pretty awesome right?
We are simply not passing Id and Date to these methods because we want them to be updated automatically. For instance, id is going to increment by taking the Max value. Date will be today’s date and in the format of yyyy-MM-dd.
public void CreateExpense(string expenseName, decimal expenseAmount)
    {
        var items = _expenseRepository.Load();
        var id = items.Count ==0 ? 1 : items.Max(item => item.Id) + 1;
        items.Add(new Expense(id, expenseName, DateTime.Now.ToString("yyyy-MM-dd")	, expenseAmount));
        _expenseRepository.Save(items);
}DeleteExpense, UpdateExpense, and ClearExpense basically follows the same exact logic, so I will be skipping that to SummaryService.
Summary Service and its Commands
SummaryService is where it gets serious. It allows you to calculate and review your expenses for the current year. You are also able to filter by month. If year not passed, it will default to your current year, and if you don't want that, then there is a way around it.
expense-tracker summary Command is pretty awesome in this way.
SummaryService have 3 methods.
TotalExpensestakes month and year.
To calculate for your expenses, it checks whether a month is provided, if not, it computes all of your expenses, regardless of year and month.
However, if month is provided, it checks whether year is provided as well, if not, it defaults to the current year.
 public void TotalExpenses(int? month, int? year)
    {
        var items = _expenseRepository.Load();

        if (month.HasValue)
        {
            year ??= DateTime.Now.Year;
            var itemsFiltered = FilterByMonthYear(items, month, year);
            decimal sum = SumExpenses(itemsFiltered);
            Console.WriteLine($"Total expenses for month {month} of year {year}: {sum}");
        }
        else
        {
            decimal sum = SumExpenses(items);
            Console.WriteLine($"Total expenses for current year: {sum}");
        }
    }
SumExpensesis a method to calculate the expenses
private static decimal SumExpenses(IEnumerable<Expense> items)
    {
        return items.Sum(item => item.Amount);
}FilterByMonthYearfilters the items by the month or year we need our total expenses to be in.
private static IEnumerable<Expense> FilterByMonthYear(List<Expense> items,  int? month, int? year)
    {
        var matched = items.Where(e =>
        {
            if (!DateTime.TryParseExact(e.Date, "yyyy-MM-dd",
                    CultureInfo.InvariantCulture, DateTimeStyles.None, out var dt))
            {
                return false;
            }
            return dt.Year == year && dt.Month == month;
        });
        return matched;
    }
Pretty simple is it not?
Its command takes 2 options, of which only monthOption is required.
Command summaryCommand = new("summary", "summary expenses list");
        summaryCommand.Options.Add(filterMonthOption);
        summaryCommand.Options.Add(filterYearOption);
        rootCommand.Subcommands.Add(summaryCommand);
summaryCommand.SetAction(result =>
{
var file = result.GetValue(fileOption);
var month = result.GetValue(filterMonthOption);
var year = result.GetValue(filterYearOption);
var repo = new ExpenseRepository(file);
var service = new SummaryService(repo);
service.TotalExpenses(month, year);
}
);CsvExport Service and its Commands
Lastly, we want to be able to export our data to a CSV.
Now rewind to above. You must have noticed that I said we are reading from a JSON file.
So our data basically resides there.
Now we want to take all those data and export to a CSV. So let us do that now.
CsvExporterService is the service handling this process.
Its method ExportJsonToCsv uses a StreamWriter to allow us to write to the CSV.
 public void ExportJsonToCsv(FileInfo outCsv)
    {
        var items = _expenseRepository.Load();

        if(outCsv.Directory is not null) Directory.CreateDirectory(outCsv.DirectoryName);

        var writer = new StreamWriter(outCsv.FullName);

        using (var w = new ChoCSVWriter<Expense>(writer)
                   .WithFirstLineHeader())
        {
            w.Write(items);
            Console.WriteLine($"Exported {items.Count} expenses to {outCsv.FullName}");
        }
    }
Option<FileInfo> outCsvOption = new("--out")
{
Description = "CSV output file",
Required = false,
DefaultValueFactory = _ => new FileInfo("expenses.csv")
};outCSVOption represents the CSV file path we are writing to.
This is then passed to the exportCsvCommand
exportCsvCommand.SetAction(result =>
            {
                var file = result.GetValue(fileOption);
                var outCsv = result.GetValue(outCsvOption);

                var repo = new ExpenseRepository(file);
                var service = new CsvExporterService(repo);
                service.ExportJsonToCsv(outCsv);

            }
        );
Loading it up into an actual tool
I followed through the bottleneck dev blog to setup the csproj and did some actual installation - I have attached the link for your reference.
Let us test this out~
After installing it, this is how it should look when you type expense-tracker in your terminal.
If it is not set up globally then it will throw an error.
Provided to us, as you can see, are commands that we can use.

Let us add some data
expense-tracker add --name "groceries" --amount "10"
expense-tracker  add --name "electricity" --amount "30"
expense-tracker  add --name "gas" --amount "120"
expense-tracker  add --name "game" --amount "40"
expense-tracker  add --name "sindic" --amount "20"
expense-tracker  add --name "water" --amount "1"
expense-tracker  add --name "water" --amount "9"
Results:
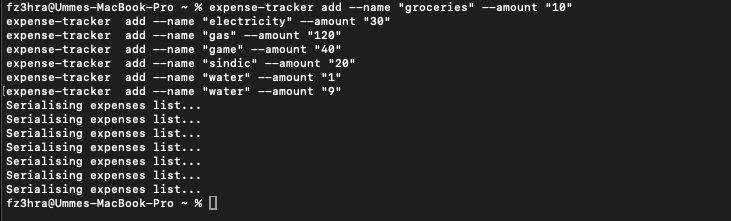
We can view our data by running expense-tracker read since nothing is shown as output when adding expenses.
That gives us:

Now I want to have a summary of my expenses, I will be using the commands as below
expense-tracker summary
expense-tracker summary --month 9
expense-tracker summary --month 1
expense-tracker summary --month 8
expense-tracker summary --month 8 --year 2022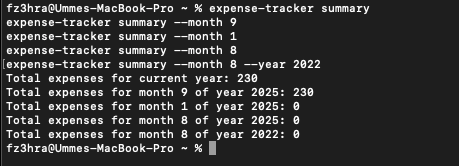
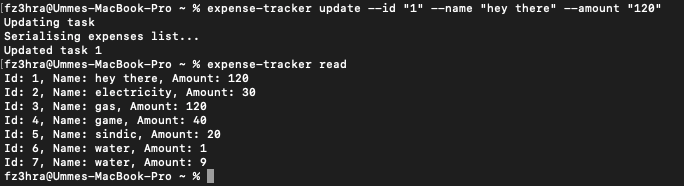
Updating a task is as follows expense-tracker update --id "1" --name "hey there" --amount "120"
Now let us delete that entry by running expense-tracker delete --id "1"
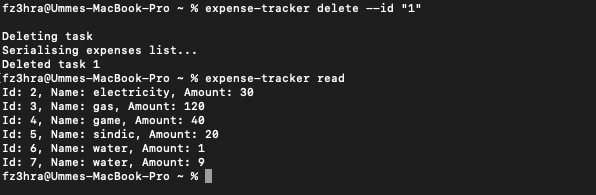
There we go, it is working perfectly.
And that's basically it.
I hope this blog post was insightful to you and you were able to learn something new.
References


About Me
I am Zaahra, a Google Women Techmakers Ambassador who enjoy mentoring people and writing about technical contents that might help people in their developer journey. I also enjoy building stuffs to solve real life problems.
To reach me:
LinkedIn: https://www.linkedin.com/in/faatimah-iz-zaahra-m-0670881a1/
X (previously Twitter): _fz3hra
GitHub: https://github.com/fz3hra
Cheers,
Umme Faatimah-Iz-Zaahra Mujore | Google Women TechMakers Ambassador | Software Engineer